Category: Uncategorized

ClearNode API 102 …

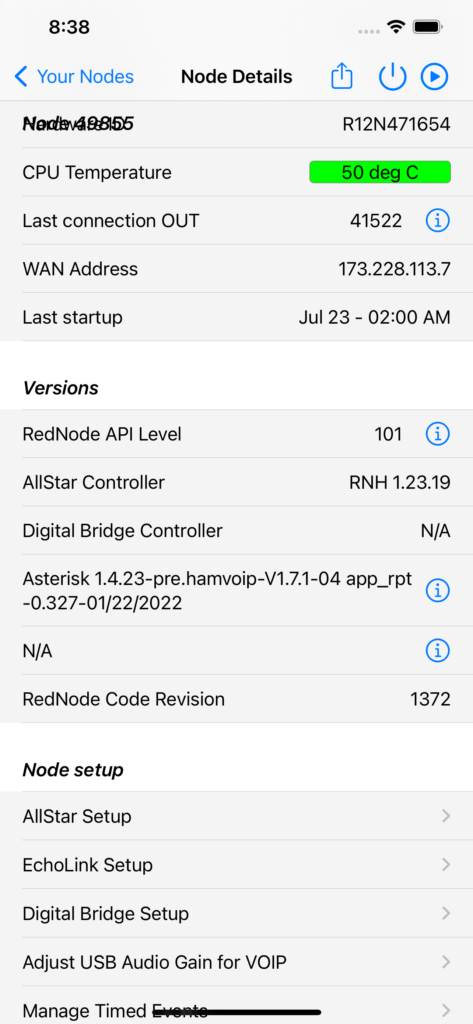
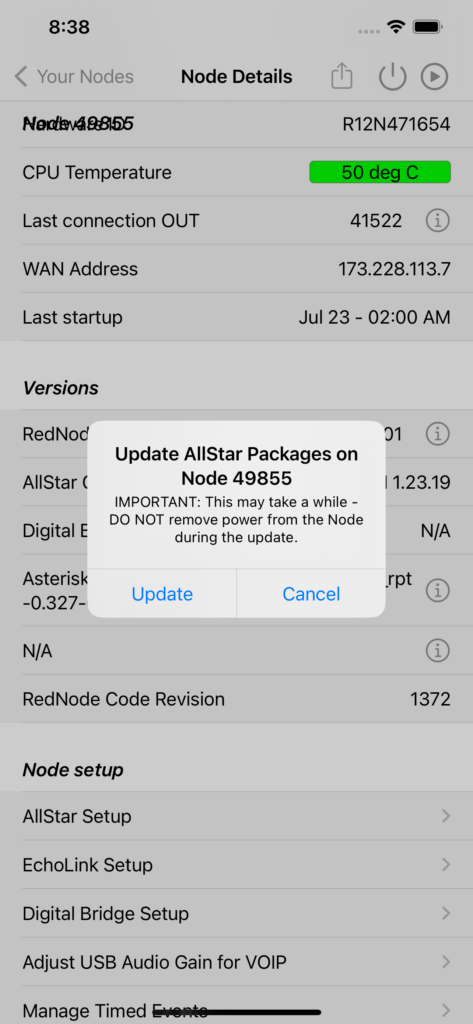
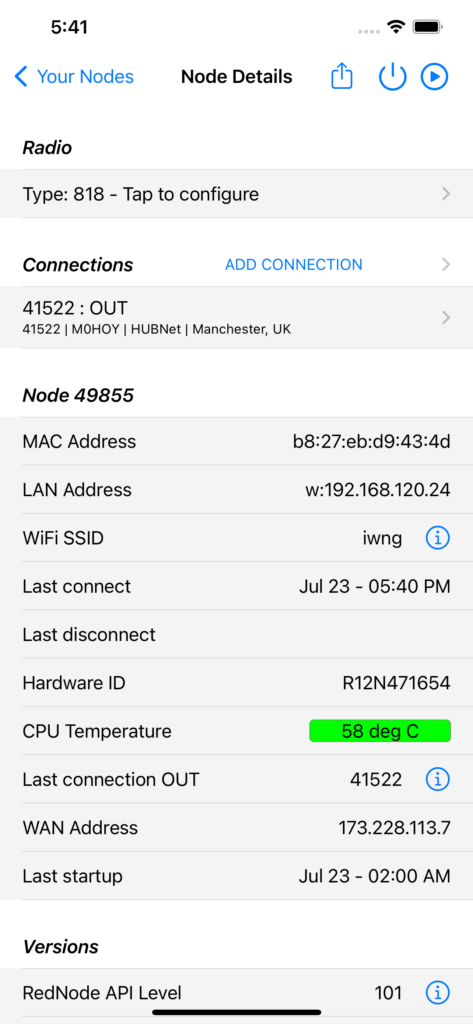
Some of you have already noticed the release of API 102 – you will get it automatically if you have automatic updates enabled and your reboot your node … or you can get it manually by tapping on “Node Details” > “Versions” > “RedNode API Level”. Do upgrade when you get the chance.

No new functionality, this is a maintenance release to clear up some minor bugs and installs some “Support” utilities to help us inspect your node when you call for help.

73 … Gerry.


DSTAR is available …

In release API 101 and ClearNode App 1.40 we included support for DSTAR.

However, there are caveats – you must use a DV3000 hardware voice encoder USB dongle to get acceptable audio quality. The audio without it is unusable and likely will get you banned from the Reflector. So the node won’t allow connections if it doesn’t detect the hardware encoder.

There are occasional hardware incompatibilities that sometimes means the DV3000 hardware encoder disconnects – see our notes referenced below.

We’ve put up some extensive notes on using DSTAR on your ClearNode. Please read them thoroughly before you get in touch to request enabling of DSTAR on your node (your node will have to be online for it be enabled).

73 … Gerry.


ClearNode API 101 and App 1.40 released …

In this release:

  • Provisional support for DSTAR – there will be another announcement on that later – we’re still sorting out some details – so don’t email asking us how or when
  • “Jitter” is exposed in the Digital Bridge Setup > DMR Setup
  • Ability to clear COREDUMPS from the Node Details context menu
  • You can use the ADD CONNECTION screen to Tag your own nodes – those tags will then be displayed on the Your Nodes screen. You will have to connect from one of your nodes to the one you want to tag so you can Tag it. If your nodes are all on the same network you will have to run “Configure Private Nodes” first so you can connect one node to another. If you only have one node then you can’t Tag it since it can’t be connected to itself, and why would you want to anyway.
  • Some changes in the Manage WiFi Networks screens to make sure that leading and trailing spaces are trimmed off any Network Names (SSIDs) and Password.
  • AllStar Setup now checks your Broadcastify “BCFY Play Url” is populated so you can play the stream in the ClearNode mobile app.

73 … Gerry.


Did you know ? … Episode 9

ClearRPT has a programmable GPIO

Five of the Raspberry Pi GPIO pins are wired out to the ClearRPT‘s DSUB 15 connector. You can control them in real time from the ClearNode mobile app – at the bottom of the Node Details screen tap on “GPIO Control”.

You can also control them from your Timed Events – create separate events for each pin and for turning them off and on.

73 … Gerry.

(This is the latest episode in a series of posts to help you discover all the functionality that you might not know exists in your ClearNode, ClearAlpha, ClearZero or ClearRPT. We’re going to publish episodes periodically – some come back often and join us !)


ClearZero is back in stock !!

After a hiatus of over a year, we were able to get a significant shipment of the Raspberry Pi Zero 2W boards – ClearZero production is under way !

73 … Gerry.


HamVoIP “say24time.pl” update …

Apparently there was a bug in the script that announces time in 24 hr mode that had been lurking around for quite some time. The folks at HamVoIP jumped on the fix as soon as they became aware of it. The update is now available. This is a minor fix and has not security implications.

You can get the update by tapping on the “Asterisk 1.4.23 …” row in the Versions section of Node Details.

Be patient and wait for your node to reboot after the update. Do not interrupt power during the update. The version # in that “Asterisk …” row will not change.

73 … Gerry.


Did you know ? … Episode 8

Who are you really connected to …

When you start an AllStar connection to another node or hub it generally looks like this on the Node Details screen in your ClearNode mobile app.

The underlying AllStar software is based on the Asterisk telephony open source system – it’s an incredible system with a rich feature set. One of the things it does in the background is keep a list of all the endpoints that are connected to each other. So you might think you’re only connected to 41522 – but actually you’re connected to every other endpoint that is also connected to 41522.

In the ClearNode app you can expose this plethora of links by simply tapping on the 41522 connection – it will transition to a “Links” screen that will enumerate all the other links. (This only works for direct AllStar connections.)

So mind your Ps and Qs – you never know who might be listening !

73 … Gerry.

(This is the latest episode in a series of posts to help you discover all the functionality that you might not know exists in your ClearNode, ClearAlpha, ClearZero or ClearRPT. We’re going to publish episodes periodically – some come back often and join us !)


The Care and Feeding of your Pi …

It’s fair to say that the Raspberry Pi is an amazing little device – and generally it costs under $50 ! Having said that it does have some weak spots – but if you’re aware of them you can minimize the potential for bad things to happen.

USB Power Connector

Probably the weakest spot is the Micro-USB power connector on any of the Pi 3 devices. It may also be the case for the USB-C connectors in the Pi 4 devices, but they haven’t been in the field long enough to observe.

Many of you take your ClearNode traveling which often entails repeatedly pulling and re-inserting the power cable into the connector on the side of the Raspberry Pi PCB. Unfortunately this does tend to loosen up the connector over time – eventually the connection becomes intermittent. If your finding that your ClearNode mysteriously reboots or works intermittently – that’s a good place to start looking.

It’s best if you can avoid repeatedly reconnecting power – try to keep that connector permanently in the node. The pins on the “wall-wart” end of the power supply are much more robust – disconnect there instead. In general, our advice is keep you node powered 24×7 with a weekly reboot to clear out the log files – if that’s an option.

So in short – do your best to minimize the number of times you reconnect that USB power connector – it will stay functional a whole lot longer.

SD Card and Housing

The other weak spot is the SD Card housing – we’ve had nodes returned for repair where that socket was torn completely away from the Raspberry Pi PCB, necessitating replacement of the Raspberry PI. Do your best to minimize the number of times you remove and re-insert the SD Card.

Many of you are religious about making backups of your SD Cards in case of failure. This has been a source of many calls to Support – the card gets trashed by some means during this process. Keep in mind that the historical justification for making backups is a little less credible when you’re dealing with ClearNode.

We use the HamVoIP.org distribution as our base image, which is configured to write log and temporary files to memory and not the SD Card. This has effects on the longevity of the SD Card. Firstly, since the system is not constantly writing to the SD Card, the possible destruction of the card by accidentally interrupting power is by and large eliminated. Secondly, the number of times a “bit” can be written to a location on the card is finite – they wear out ! Again, this issue is drastically limited because the system rarely writes to the card.

You are far more likely to zap the SD Card by mishandling it than it is to age out from normal use.

When handling an SD CARD always, always, always use a grounding strap on your wrist to eliminate static discharges.

It is a relatively simple process for us to regenerate your SD Card for you – generally including your latest configuration if it’s backed up to our servers. Maybe making copies of your SD Card is less justified than you think.

Raspberry Pi availability

If your ClearNode is based on the Pi 3 – we no longer have stock of that board and there are none available for purchase at the moment. If your Raspberry Pi 3 fails – you will be between a rock and a hard place !

In conclusion – give some thought to the well being of your Raspberry Pi – keep your node running as long as possible.

73 … Gerry.


Did you know ? … Episode 7

Editing Supermon titles …

Many of you use the Supermon website on your ClearNode to monitor and control connections. It’s not our preferred way and you certainly shouldn’t use Supermon to change any of your ClearNode’s configuration parameters, but for some it’s convenient since it can be accessed from your PC’s web browser.

In any web browser just type in the IP Address of your ClearNode e.g. 192.168.120.24 (you maybe able to use the node’s host name e.g. node49855, but that depends on your WiFi/Router).

We recently enhanced your ability to control some of the display values on this web page, including the titles and location. And you can also set the password for the ‘admin’ login to get to this page, as well as what HTTP port is used by the web server (80 is the default/standard).

In your ClearNode mobile app, at the bottom of the Node Details screen, tap on “AllStar Setup”. Scroll down to about half way down.

After you’ve made your adjustments, don’t forget to tap the “Save” icon in the top right corner and wait for your node to reboot.

73 … Gerry.

(This is the seventh episode in a series of posts to help you discover all the functionality that you might not know exists in your ClearNode, ClearAlpha, ClearZero or ClearRPT. We’re going to publish an episode each Sunday evening – come back and join us each week !)


Did you know ? … Episode 6

How configuration works on ClearNode

AllStar, EchoLink and the Digital Modes are software packages written by some very capable software engineers in the AllStar, EchoLink and DVSwitch communities. We at ClearNode are “standing on the shoulders of giants” – the ClearNode system is a software layer that integrates those other systems. All these software services have one thing in common – they use configuration files to know who/what they are and how they should behave. In general those configuration files are plain text files that have a very specific layout and have file extensions (the last part of the file name after the period) like “conf” or “ini”. Once in a while a configuration file has no period and no extension e.g. “/etc/hostname”.

For those folks who don’t benefit from the ClearNode system layer on their nodes – they have to edit those files directly at the Linux command line using an editor like “vi” or “nano”. As I said – those files have a very specific layout and the editing process is very unforgiving – a character in the wrong place and your node is a “lump on a stump”, until you spot the error in the file.

ClearNode generates all those files for you by reading in template files and then performing text replacement with the configuration values you enter in the ClearNode mobile app. ClearNode also stores ALL those configuration values in a master file on the node. We keep historical versions of that master file that allows you to do things like “Revert setup to previous” and “Revert setup to ex-factory” … etc.

ClearNode also keeps a copy of each node’s configuration in the data space in the ClearNode mobile app on your phone or tablet. And … if you’ve enabled “Auto Backup Node Config” … your mobile app will send a copy of the current configuration to the Node-Ventures servers for safety. So, if your node SD Card fails and you have to start from scratch – you have a couple of safety copies to work with.

Don’t edit the configuration files directly

When you open your ClearNode mobile app and navigate to one of the setup screens – the app asks the node to send over it’s current configuration – it DOES NOT read individual configuration files – it reads the master configuration file and sends that over to your mobile app. After you open the configuration screen there is a request to, and response from your node – and then the screen displays the current information. Take a look at the title of the configuration screen – sometimes you can spot the title changing from “Setup (from default/preference)” to “Setup (from Node”) – that’s how you know that the request/response has completed and you are looking at the latest values from the node.

If you have edited the “ini” and “conf” files directly the screen above will NOT reflect the values you edited – it will display the last values you saved via the mobile app above, and when you Save the values to the node your previous direct edits will be overwritten.

You can, of course, chose to ignore the ClearNode mobile app and do the editing yourself at the command line – but just be aware – it’s a binary choice – do one or the other – but not both.

Advanced users: if there’s a particular value in one of the native configuration files that you don’t see exposed in the ClearNode mobile app setup screens – please get in touch – chances are we’ll add it in with the next software release.

Darn my SD Card failed – now what ?

Fear not – we can either send you a replacement, pre-configured with the last values you saved on our servers, or we can have you download a factory image and burn it to a new SD Card. Once that’s done we’ll complete the setup remotely over the network.

But what if you never saved your node’s configuration to our servers ? Again … fear not … it’s likely you have a copy of that configuration in your mobile phone, because every time you Save the configuration to your node, it’s also stored in the mobile app just in case.

Here’s a typical scenario – your SD Card failed – you downloaded the factory image, burned it to an SD Card, powered up the node and we have completed our initial prep – you have a functioning node again. But look it’s got no configuration !

Click on your node, and then from Node Details screen, select “AllStar Setup” – you get the default factory values, which are pretty much useless to you.

Go ahead and enter your node # and accept/return – you will get a popup offering you the node setup previously saved into the ClearNode mobile app.

Go ahead and accept “Reuse previous values from App” – and bingo – you’ve got your old settings back !

Save those values to the node (“Save” top right corner) and wait for your node to reboot. You are back in business ! You can also click on the Share menu and choose “Restore/Download Node Setup” – if you had previously backed up your configuration to our server, it will be retrieved so you can reuse it.

73 … Gerry.

(This is the sixth episode in a series of posts to help you discover all the functionality that you might not know exists in your ClearNode, ClearAlpha, ClearZero or ClearRPT. We’re going to publish an episode each Sunday evening – come back and join us each week !)